Windows authentication for coldfusion 9 datasources

Let’s get into the topic right away.

Simple and straight forward steps on how to setup a Coldfusion 9  datasource with SQL Server 2008 in Windows Authentication mode.

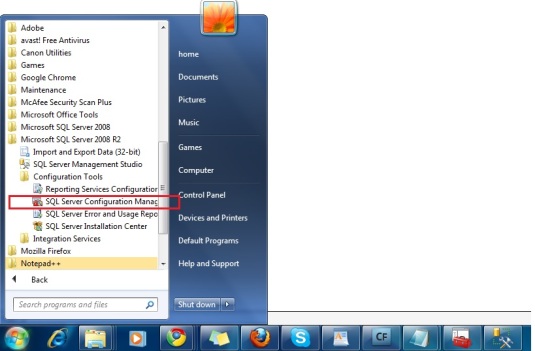
Step 1:-  Go to Programs –>  Microsoft SQL Server 2008 R2 –>Configuration Tools –>SQL Server Configuration Manager.

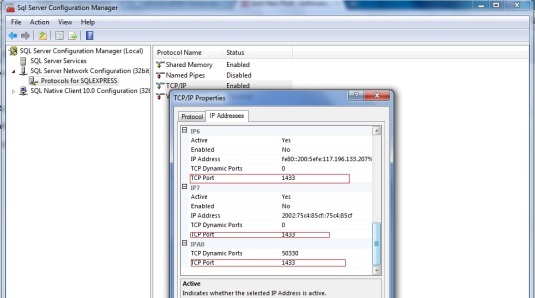
Step 2: Enable the  TCP/IP protocol under SQL Server Configuration Manager > SQL Server Network Configurations > Protocols for SQLEXPRESS

Step 3: Now double-click the TCP/IP protocol to view the properties. Click on the IP Addresses tab and make sure that the TCP Port is set to 1433 for every IP type.

Step 4: Log in to CF9 Administrator and create a new datasource. While setting up the datasource give the Database name and datasource name the same. Give the server name as “localhost” and the port as your TCP/IP port.

Congratulations. You just  created a datasource that connects to a SQL Database with  Windows Authentication.

Command Line API in Firebug

Long time since I have made a  post. This time it is on one of my fav web development tool Firebug. It has got a cool command line API console for writing JavaScript commands that can be executed on the fly. This is particularly important when we debug large JavaScript code. We need to reload the js file each time after making any changes – which can be quite time consuming. Here is where command lines can be of great help.

There are two type of Command lines API:-

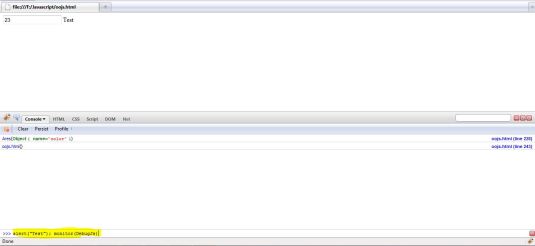
  1. One Line Command Line – This is the default command line. We can write a single line of JavaScript code here. Also it supports auto complete feature (i.e by hitting the tab key you can complete your js code just like other well known editors). After writing your code press enter. The code gets executed and you can see the execution details under the  console window. See highlighted area below.

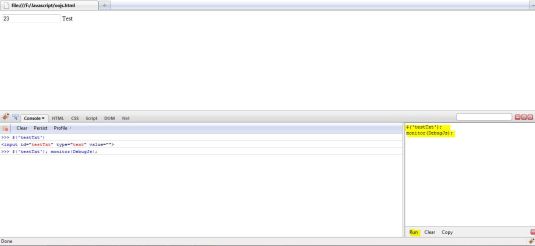
2. Multi Lines Command Line – Here we can write and excute multipe lines of code on the fly. Write your js code and click Run button. The code gets excuted and you can see the execution details under the  console window. Firebug also provides a list of APIs to access the DOM element as well as to monitor and profile the javascript code that is getting executed. Typing these in the command line and executing helps us to  see what is the value of an HTML element,whether a function has been executed or not etc.

Firebug as always Roxx..  🙂

CF Admin glitch while Updating Scheduled tasks?

I faced an issue while working with scheduled tasks long back but though of blogging this now. If the interval specified while creating the task was more than 24 hours then we will not be able to update the task from Coldfusion Administrator.

So here we are creating the schedule task through code. Take a note of the interval.

<cfschedule action = “update”
task = “TaskName”
operation = “HTTPRequest”
startDate = “8/7/98”
startTime = “12:25 PM”
interval = “360000”
resolveURL = “Yes”
publish = “Yes”
file = “sample.html”
path = “c:\inetpub\wwwroot\playpen”
requestTimeOut = “600”>

The interval 360000 is like 100 hours.

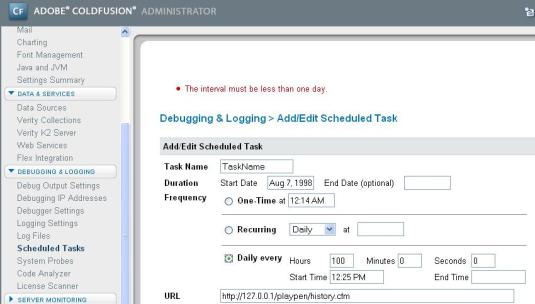
Now log into the CF Administrator and try to update the task by changing the frequency to One Time.

The Admin throws error message saying that the interval must be less than one day.

The only way i see to update this schedule task is through code.

Is this a glitch of CF admin? I don’t know.

Security update for ColdFusion versions 9, 8.0.1, and 8 and a word of caution

A new security update for ColdFusion versions 9, 8.0.1, and 8 is available now. Important vulnerabilities have been identified for these versions that could lead to cross-site scripting and information disclosure. So an update is highly recommended.

http://www.adobe.com/support/security/bulletins/apsb10-11.html

But after taking updates it was reported that the update killed the datasources in the CF admin. After deleting shf8010001.jar from {CF_HOME}/lib/updates/ and restarting the ColdFusion service CF is up and running again. We are still waiting for Adobe to resolve this issue.

Google Chrome speed tests

With the release of new Chrome,  Google has shown how much importance they are giving for speed and performance. In fact they have gone ahead and compared the browser’s speed with real life objects.  – Just to show how fast the web page is being rendered (Yes that’s right  – loading at 2,700 frames per second!) . This is what Google has showed off:

FaceBook security hole…

Yesterday witnessed a  major security flaw in the social networking site facebook that, with just a few mouse clicks, enables any user to view the live chats of their ‘friends’. Using what sounds like a simple trick, a user can also access their friends’ latest pending friend-requests and which friends they share in common. See by yourself how “secure ” are our social sites:-

By the time I have finished this post  they would have fixed this bug(they better be!!!).

Customizing Ckeditor and adding a new toolbar button

It’s been a long time since i have put a blog entry. This time i will discuss how to customize a Ckeditor and how to  add new plugins(buttons in the toolbar) to the ckeditor. I got little help while googling. Hope this would be helpful.

Step 1: Download and install the Ckeditor js files. This link would get you setup a sample ckeditor in your local machine.

Step 2 : Customizing the toolbar:

We can specify which all toolbar buttons needs to be shown in our ckeditor. You can refer here for the toolbar definition.

Now we need to add a new button with a user defined functionality to our Ckeditor toolbar. In this example we are creating a button that wraps an anchor tag around a selected text inside the Ckeditor(same functionality as existing anchor button in the ckeditor).

Each button in the ckeditor toolbar is a plugin and their definitions are stored in ckeditor\plugins\ folder. In this folder we create a new folder with our plugin name. Here linkbutton. Inside the linkbutton folder we create a plugin.js file which contains the core functionality of the plugin/button.

It will contain the following code:-

(function(){
//Section 1 : Code to execute when the toolbar button is pressed
var a= {
exec:function(editor){
var theSelectedText = editor.getSelection().getNative();
CallCfWindow(theSelectedText);
}
},
//Section 2 : Create the button and add the functionality to it
b=’linkbutton’;
CKEDITOR.plugins.add(b,{
init:function(editor){
editor.addCommand(b,a);
editor.ui.addButton(‘linkbutton’,{
label:’Link Button’,
icon: this.path + ‘logo_ckeditor.png’,
command:b
});
}
});
})();
Note in the above code in Section 1  var a will contain the functionality to execute when the button is pressed. Here we are creating a coldfusion window and pass the selected text from the ckeditor. In Section 2 we create the button and add the functionality to it. We also give the path of the image that needs to be shown in the toolbar for the button. Here it is logo_ckeditor.png and is inside the linkbutton folder.
Next open the ckeditor/ckeditor.js file and search for ‘about‘ in the file. It will find a place where all the plugins are registered. Add your plugin name(here linkbutton) here.
UPDATE: Actually you don’t need to edit the ckeditor.js file as this will not work when a newer version comes. You can instead edit the config.js and add the plugin name there.
config.extraPlugins = ‘pluginX,pluginY,yourPluginNameHere’;
Go to this link for more reference.
Now open the ckeditor/config.js file and add your plugin name (here linkbutton) to the toolbar definition.
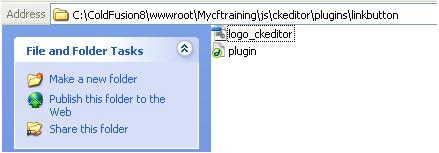
Note: The name given for the plugin should be consistent everywhere. The folder structure will look as below:-
That’s it!! We created a new plugin for our Ckeditor. For wrapping the anchor tag around the selected text we use the following code:-
function FormatEditorText()
{
var myEditor = CKEDITOR.instances.editor1;
var theSelectedText = document.getElementById(‘txtSelected’).value;
var theAnchorText = document.getElementById(‘txtAnchor’).value;
var FormattedText = ‘<a href=”‘+theAnchorText+'”>’+theSelectedText+'</a>’;
myEditor.insertHtml(FormattedText);
}
Helpful links :
http://cksource.com/forums/viewtopic.php?f=11&t=16306&hilit=+get+name+toolbar+button
http://cksource.com/forums/viewtopic.php?f=11&t=16149&hilit=get+selected+text&sid=ebf293139b6f0777b285369a136ae819
http://blog.tommed.co.uk/2009/09/07/how-to-create-a-ckeditor-v3-plugin
http://cksource.com/forums/viewtopic.php?f=11&t=15539&hilit=creating+a+custom+button
http://docs.cksource.com/ckeditor_api/symbols/CKEDITOR.html
http://syrinx.ph/articles/CkEditorPluginGuide.aspx
I will post a live sample soon ;-).

A Simple Jquery Twitter Widget

Twitter is familiar for all of us now…Listing twitter feeds using Jquery will be fun as well…Let’s create a Jquery – Twitter widget that can be used in our website.  I have only started off with learning Jquery. So i guess  this might be easy for beginners of Jquery…

Our Jquery-Twitter widget will have 3 tabs. The first tab will show the public twitter timeline (means the 20 most recent statuses from non-protected users). The next tab shows the latest 5 tweets of the user and the final tab shows the Twitter profile info of the user.

The first step is to create the Jquery widget. Later we will call the Twitter feeds using inbuilt ajax functions of Jquery.

Step 1 : Creating the Jquery Widget

Creating a Jquery Widget have been wonderfully explained in Webitect. You can refer that tutorial here.  Below is my version.

Create an HTML page with the following code:-

<html xmlns="http://www.w3.org/1999/xhtml" xml:lang="en" lang="en">
<head>
<script src="js/jquery-1.3.2.min.js" type="text/javascript"></script>
</head>
<body>
<div id="sidebar">
<div>
<h5>Public</h5>
</div>
<div>
<h5>Mine</h5>
</div>
<div>
<h5>About Me</h5>
</div>
</div>
</body>
</html>
<html xmlns="http://www.w3.org/1999/xhtml" xml:lang="en" lang="en">
<head>
<script src="js/jquery-1.3.2.min.js" type="text/javascript"></script>
</head>
<body>
<div id="sidebar">
<div class="widget">
<h5>Public</h5>
</div>
<div class="widget">
<h5>Mine</h5>
</div>
<div class="widget">
<h5>About Me</h5>
</div>
</div>
</body>
</html>

Here we include the jquery library inside the script tag. We then create the skeletal structure of our widget. The three divs corresponds to three tabs. We give the title for each tab in the <h5> tag.

So the basic structure is ready. Now let’s use Jquery to create a tabbed appearence.

$(document).ready(function(){
var newWidget="<div class='widget-wrapper'><ul class='tab-wrapper'></ul><div class='new-widget'></div></div>";
$(".widget").hide();
$(".widget:first").before(newWidget);
$(".widget > ul").each(function(){
$(".tab-wrapper").append("<li class='tab'>"+this.id+"</li>");
$(this).appendTo(".new-widget");
});
});

The above code runs as soon as the page runs. Here we are creating a main div (with class name widget-wrapper) that holds the Widget. Inside this main div we create a unordered list with class tab-wrapper that holds the tab name and then another div with class name new-widget that holds the content inside each tab. We create an html string for these and assigns to a variable newWidget.  Next step is to  hide all elements with class name widget . Now, we’ll use the first widget as a reference point to insert our tabbed container, using the jQuery before() function.

Now we will loop thru each unordered lists inside a div with class widget and then append a list with class “tab” and the text inside the <li> as the id of each <ul>. Please note that the id of each <ul> will be shown as the tab header.

So our Jquery widget is created in  tabbed format with no content in it.  Let’s fill each tabs with twitter content while clicking the tab header. We use separate  twitter API methods to fill the content for each tab.  The code is as below:-

$(".tab").click(function(){
var obj = this;
if($(obj).text() == 'public')
{
var url ="http://twitter.com/statuses/public_timeline.json?callback=?";
}
else if($(obj).text() == 'mine')
{
var url = "http://twitter.com/status/user_timeline/ajithmanmu.json?count=5&callback=?";
}
else
{
var url = "http://twitter.com/users/show/ajithmanmu.json?callback=?";
}
$.getJSON(url,{obj:obj},
function(data){
$("#"+$(obj).text()).html('');
var mystr = '';
if($(obj).text() == 'about')
{
mystr = "<li><table><tr><td>"+"<img src='"+data.profile_image_url+"'>"+"</td><td>"+data.friends_count+" following</td><td>"+data.followers_count+" followers</td></tr>"
mystr = mystr + "<tr><td>"+data.name+"</td></tr>"
mystr = mystr + "<tr><td>"+data.description+"</td></tr>"
mystr = mystr + "<tr><td><a href='"+data.url+ "' target='_blank'>Website</a></td></tr>"
mystr = mystr + "<tr><td><img src='twitter-bird-2.png' height='60px' width='40px'/></td><td><a href='http://twitter.com/ajithmanmu'>Follow Me</a></td></tr></table></li>"
}
else{
$(data).each(function(i,tweetobj)
{
if(mystr == '')
{mystr = "<li>"+"<img src='"+tweetobj.user["profile_image_url"]+"'>"+tweetobj.text+"</li>"
}
else
{
mystr = mystr + "<li>"+"<img src='"+tweetobj.user["profile_image_url"]+"'>"+tweetobj.text+"</li>"
}
})}
$("#"+$(obj).text()).append(mystr);
$(".new-widget > ul").hide();
$('#'+$(obj).text()).show();
$(".tab").removeClass("active-tab");
$(obj).addClass("active-tab");
});
});


The getJSON function calls the required twitter method and then generates the html content inside its success function.

Also make sure that on page load one tab always needs to be  selected. For that just before the closing of the $(document).ready function give the following code:-

$(".tab:first").click();


So we have created a simple Jquery-Twitter widget. I hope its not very confusing for u….If you have any queries please feel free to get back in touch.

You can see a running example here.
Ajax call in ModelGlue without rendering a view

Making an Ajax call is simple and straight forward in ModelGlue.  The concept is simple and is given in detail in Doug’s blog. Read the full tutorial.

In ModelGlue(2) to call the Ajax call we need to have a view. i.e a page needs to be created to act as the view. This is in need if we are using the Ajax call to dynamically load HTML content. The Javascript receives the rendered view and does whatever it was told to do with it. But however there are times when we do not want to have a view rendered for our event(i.e our Ajax call). We simply want to return a value from server(it can even be a mere checking..!!) and assign it to a Javascript variable. For this simple purpose we do not want to create a new page/view.

In order to accomplish this we will have to break the ModelGlue architecture (till now..i couldn’t find any other suitable methods). Anyone who is familiar to ModelGlue architecture will find it easy to understand the below code.

My ModelGlue event:

<event-handler name="test.testFunction">          
     <broadcasts>
          <message name="testFunction" />
     </broadcasts>
</event-handler>                    

Please note that i am not using a view in this event.

And my controller function:-

<cffunction name="testFunction" returnType="any" output="true" >    
<cfargument name="event" type="any" required="true">        

<cfset justtest = 1>

<CFCONTENT TYPE="text" RESET="Yes"><CFOUTPUT>#serializeJSON(justTest)#
<cfset request.modelGlueSuppressDebugging = true />
<cfsetting showdebugoutput="false" /></CFOUTPUT><cfabort>

</cffunction>

Here we are converting the justtest variable in JSON format and outputting via cfcontent. Here cfcontent acts as the rendered view and returns justtest in JSON format. Here aborting at the end of controller function can be considered as breaking the ModelGlue archi , but this is one way around to solve the problem.

By the way here is my Ajax call:-

new Ajax.Request(root+'test.testFunction',{
  method: 'post',
  parameters: {param1:paramval},
  onSuccess: function(response){
    alert(response.responseText);
    var myresult = response.responseText;
  }
});

I am making use of prototype library for this.

We will get 1 if we alert the responseText call back from the server.

This is only applicable to ModelGlue2. If you are using ModelGlue3 then you would also need to check out how to use fomats in MG3. Thanks Ray Camdon for sharing this link.

Removing viewstate values in ModelGlue

A quick blog post on removing viewstate values in Model Glue…everyone knows  about this, but i didn’t find any useful reference while googling this…also for my reference as well just in case i forget…

Removing a value from the viewstate:

<!--- Here key is the name of the value you want to remove--->
viewstate.removeValue('key')

Previous Older Entries